

Linux: How to Install Ubuntu Linux Server 16.04 LTS
In this Linux system administration tutorial you will learn how to complete a basic install of Ubuntu Linux Server 16.04 LTS (Xenial Xerus) with screenshots and instructions (LTS stands for Long Term Support).
Prerequisites
To complete this installation you will need a copy of the Ubuntu Linux Server 16.04 installation media. You can obtain the latest version as a DVD image (ISO) which can be used for this installation at www.ubuntu.com/download/server. Be sure to select the Ubuntu Linux Server edition as the desktop version uses a graphical installer.
In this tutorial we will be installing the x86_64 DVD ISO image on a virtual machine.
Installer Keyboard Notes
The Ubuntu text installer utilizes keyboard keys for menu selections. The following is a list of the primary keys you will use:
- Tab key or Arrow keys - Navigate from one selection to another
- Space Bar - Toggle selections on or off
- Enter key - Accept the current selections and proceed to the next step (Some keyboards may have a Return key rather than an Enter key)
Installation
The following steps will guide you through a basic installation of Ubuntu Linux Server 16.04. The installation process will take some time to complete and some steps will take longer than others.
-
To begin the installation, insert the installation media into your computer and set the computer to boot from it. When the computer has booted from the media you will see the following language selection screen appear.
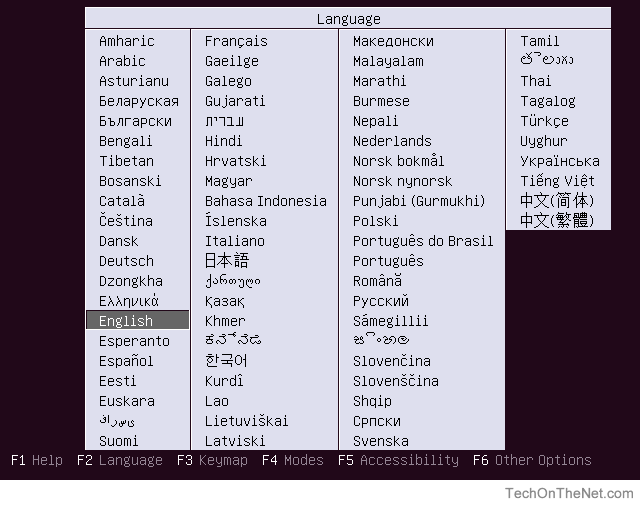
Using the keyboard Arrow keys, select the language you would like to use and press Enter. For this tutorial we will be using the default, English.
-
Next you will be asked to select an action.
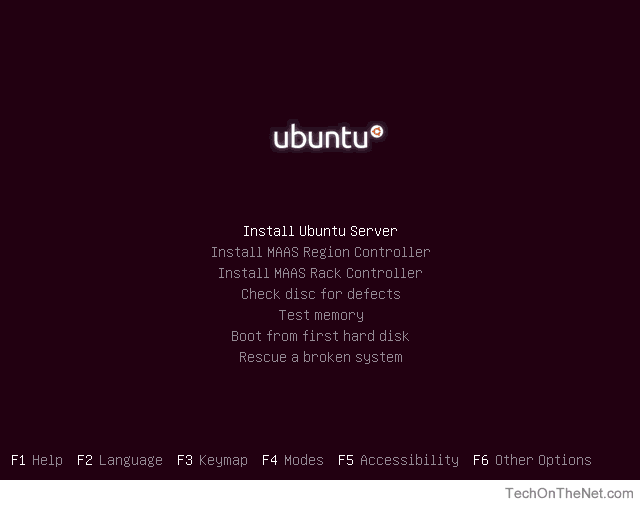
Since we are installing Linux we will choose the default Install Ubuntu Server by pressing Enter.
-
Now that we have begun the installation process, the installer will ask for the language that you would like the system to use during installation and operation.
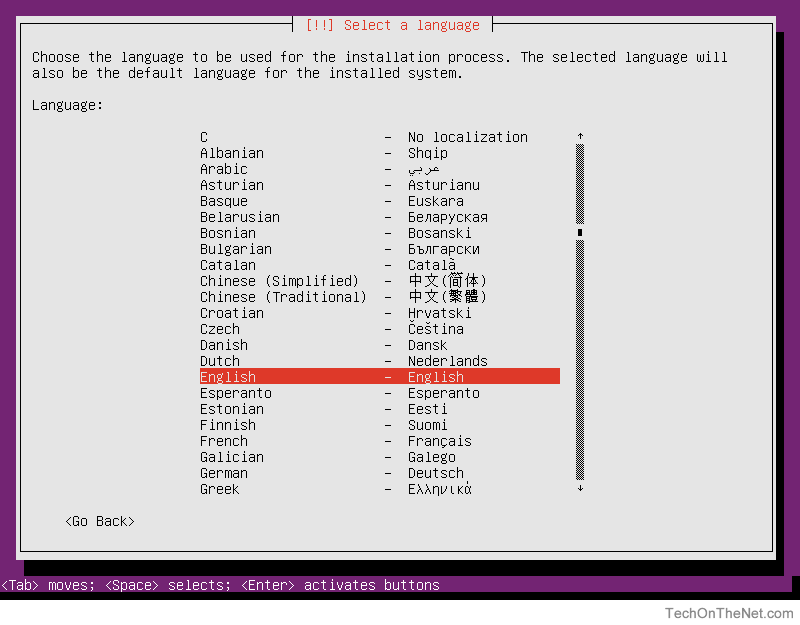
Use the keyboard Arrow keys to make your selection and press Enter. We will be using the default, English in this tutorial.
-
Once the system language has been selected you will be asked to select the location the system will use. This setting is used for configuring the locality of several system services.
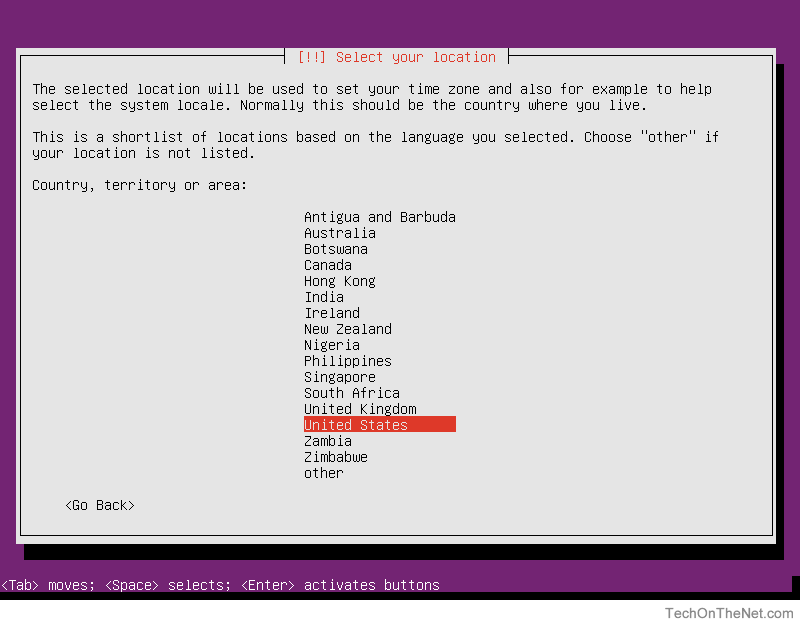
We will accept the default, United States by pressing Enter
-
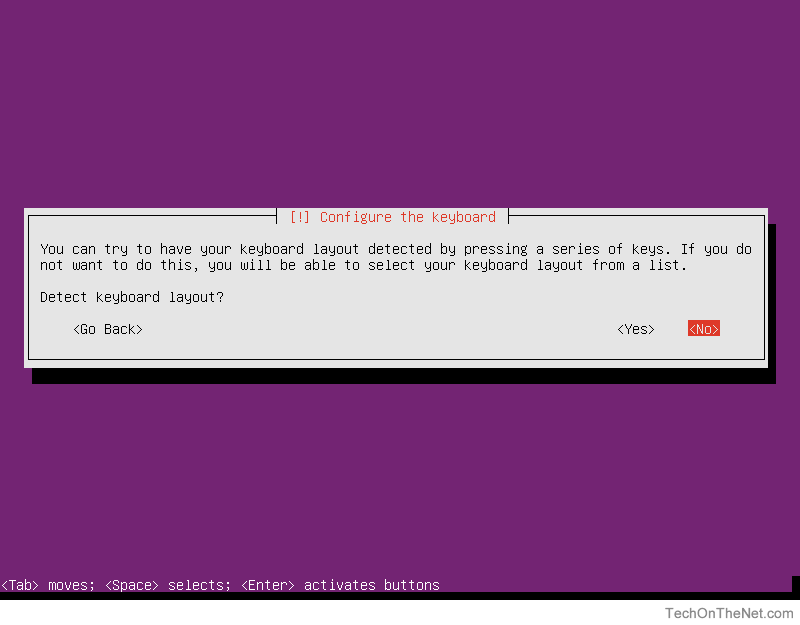
The installer will now ask whether or not it should try to detect your keyboard layout. You can select <Yes> to allow the system to detect the keyboard layout. If it is successful you will automatically skip to step 8.
If the detection is not successful you will need to complete the manual selection process in steps 6 and 7 as if you had selected <No>.
In this tutorial we will select <No> to allow us to manually select our keyboard layout. Pressing the Tab key will allow you to move between selections.
-
The first step in selecting your keyboard's layout is to choose the Country of Origin for the keyboard.
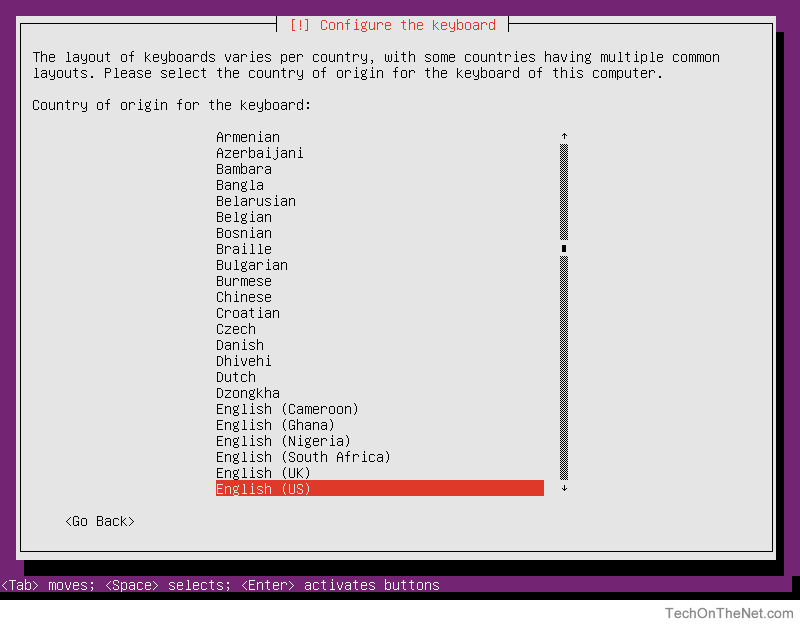
We will choose Engish (US) which is the default.
-
Next you will be asked to select the specific layout within the Country of Origin of your keyboard.
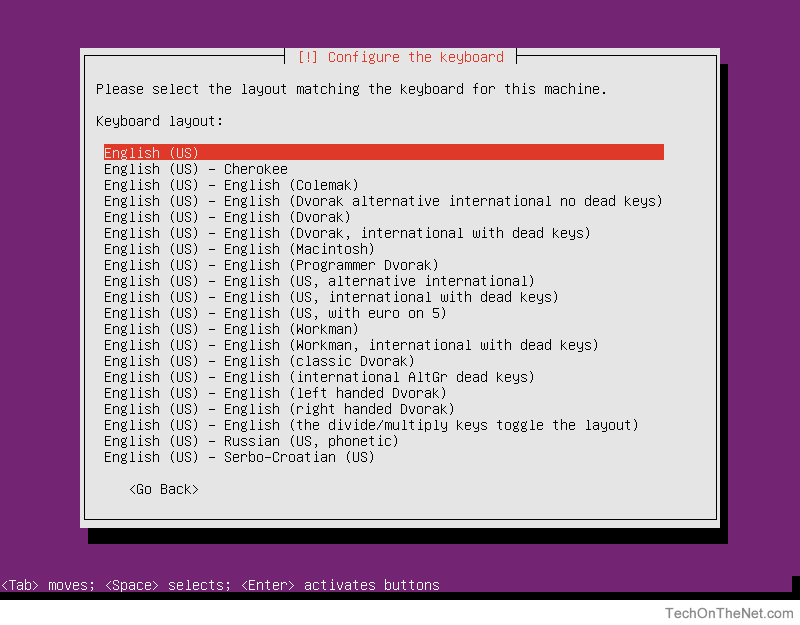
We will again choose English (US) which is the default.
-
Your system will now try to automatically configure your network options. If it is unable to do this you will be presented with the following failure message:
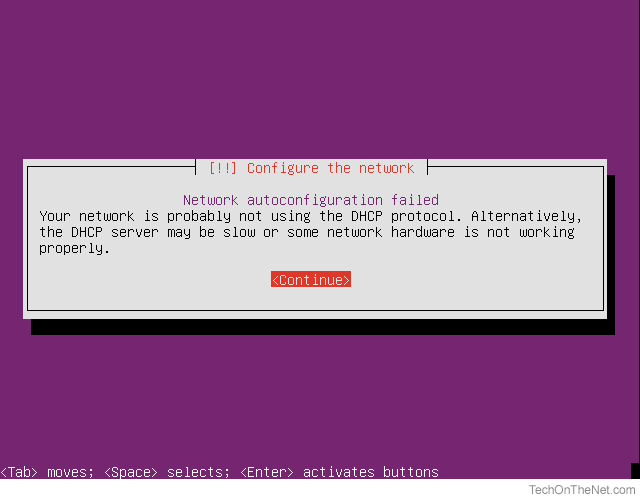
To continue to the network configuration step press the Enter key.
-
To configure your network settings you will be presented with four options.
The first two options allow you to retry the auto-configuration process. These options are useful if you are able to correct the reason your network was not able to be configured automatically and you wish to retry the automatic configuration.
You can also choose to skip configuring the network by selecting Do not configure the network at this time. If you choose to skip configuring the network, you will need to manually configure your network settings after installation completes before your system will be able to communicate with other servers on your network.
For our example we will select Configure network manually.
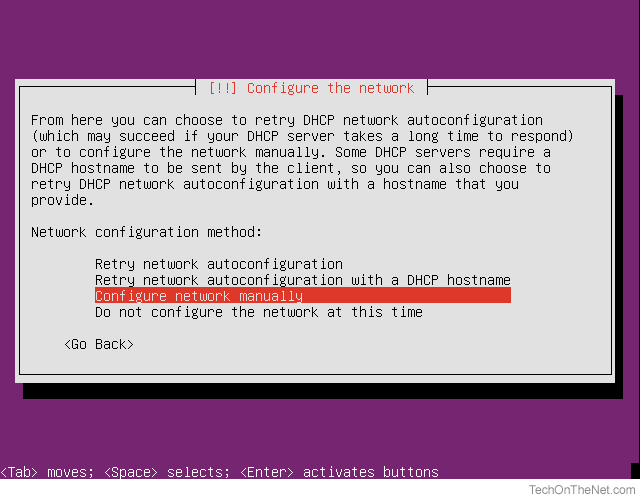
After you have made your selection press the Enter key to continue.
-
Now that we have selected Configure network manually we will be asked to enter the Internet Protocol (IP) address for our system. If you do not know your IP address please consult your network administrator for the information.
In this example we will use the IP address 1.2.3.4.
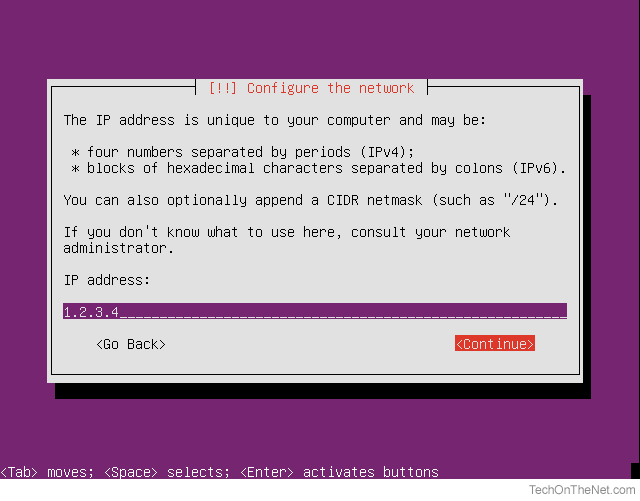
In the field provided, enter the IP address of 1.2.3.4. When done, press the Tab key until you get to <Continue> and then press the Enter key.
-
You will next be prompted to enter the network mask for your network. Again, if you do not know your network mask please consult your network administrator for the information.
In our example we will use the default 255.255.255.0 as our network mask.
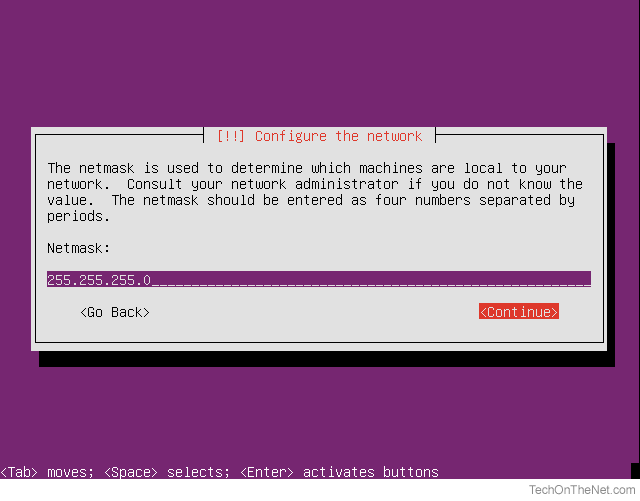
Since we are accepting the default network mask of 255.255.255.0 simply press the Tab key until you get to <Continue> and then press the Enter key.
-
In this step we will enter the IP address of the network gateway for our network. Your network administrator can provide this information to you if you do not know what it is.
In our example we will use the address 1.2.3.1 as our gateway address.
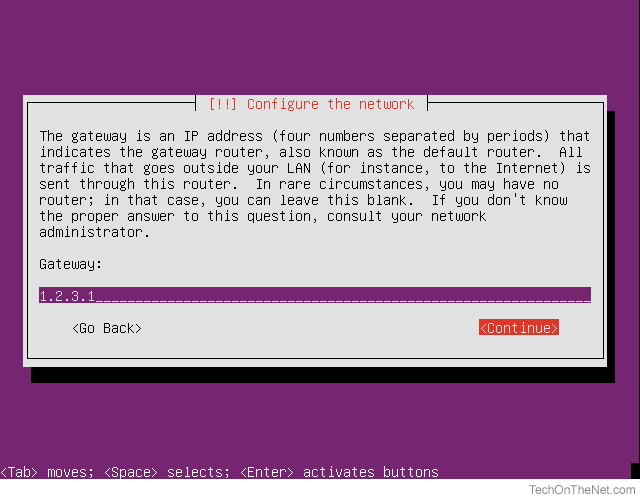
In the field provided, enter the IP address of 1.2.3.1 for the gateway address. When done, press the Tab key until you get to <Continue> and then press the Enter key.
-
In this step we will enter the IP address of the primary name server for our network. Your network administrator can provide this information to you if you do not know what it is.
In our example we will use the address 8.8.8.8 as our name server address.

In the field provided, enter the IP address of 8.8.8.8 for the name server address. When done, press the Tab key until you get to <Continue> and then press the Enter key.
-
Next you will be asked to enter the name that this host will be known as. This name can be a single word (no spaces) and should not contain special characters such as "%". It is common, however, for system adminitrators to utilize a dash "-" in their host names. (Such as web-server-1)
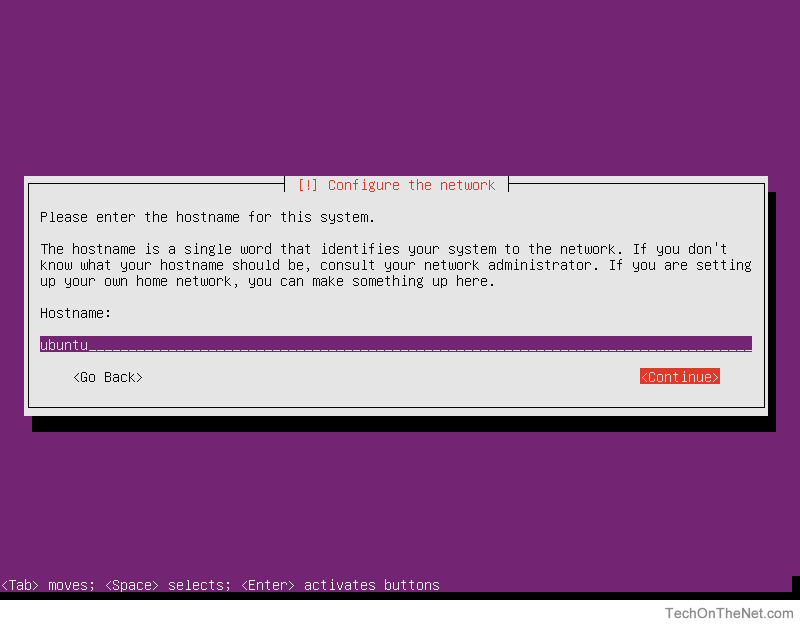
When selecting your host's name, it is important to select a meaningful name to prevent confusion with other hosts on your network.
Since the host we are building in this tutorial will not appear on a network we will leave the host name as its default value of ubuntu. Press the Tab key until you get to <Continue> and then press the Enter key.
-
In this step, you will be asked to enter the full name of the primary user of the system. (Note: On Ubuntu systems, this user is NOT the root super user but will have administrative capabilities.)
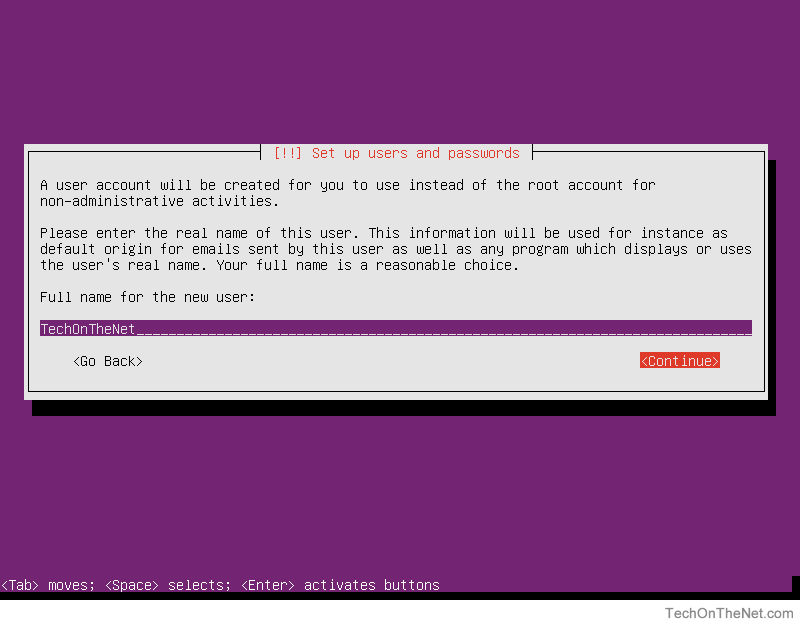
On our system we will set this user name to TechOnTheNet but you may choose to use your full name (e.g. John Doe). Press the Tab key until you get to <Continue> and then press the Enter key.
-
Next, we will enter the user name we will use to log in. This name should be lowercase and not include spaces or non-alphanumeric characters (Characters that are not numbers or alphabetic characters).
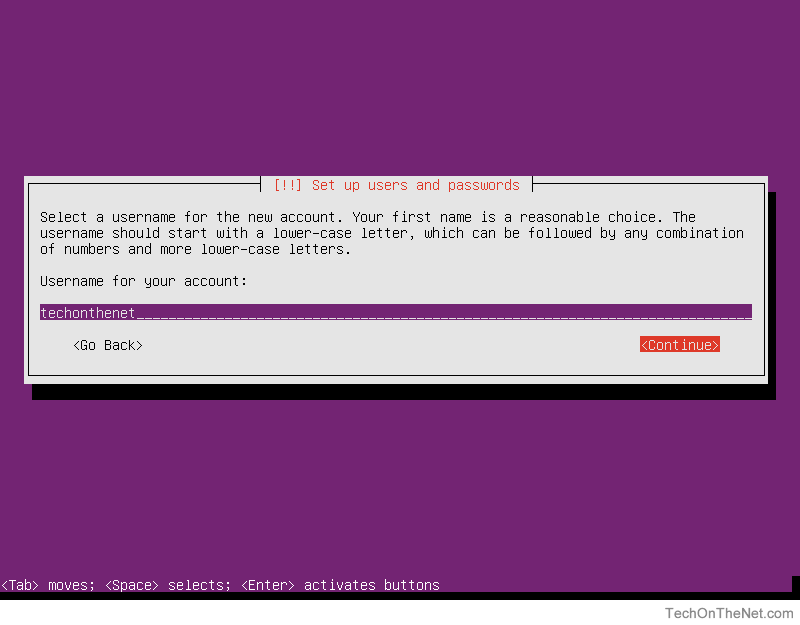
In our example we will use techonthenet for our user account. Press the Tab key until you get to <Continue> and then press the Enter key.
-
On this screen, you will need to enter the password you would like to use for the techonthenet user account.
It is important to choose a strong password that cannot be easily guessed and that you'll remember! (Typically strong passwords are more than 8 characters long and contain upper/lower case characters and have numbers or special characters such as a "$".)
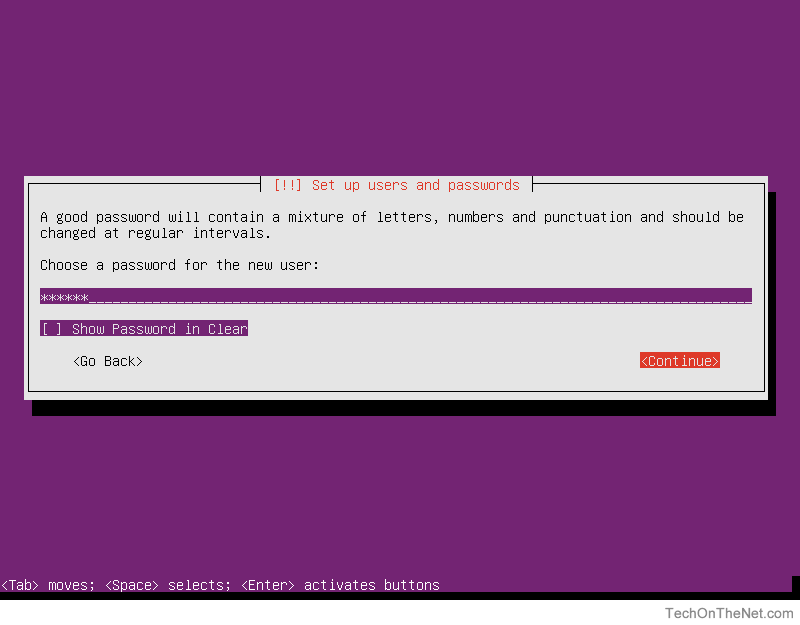
After entering the password, press the Tab key until you get to <Continue> and then press the Enter key.
-
In this step, you will be asked to re-enter the password you used from the previous step. This is to ensure that the passwords match.
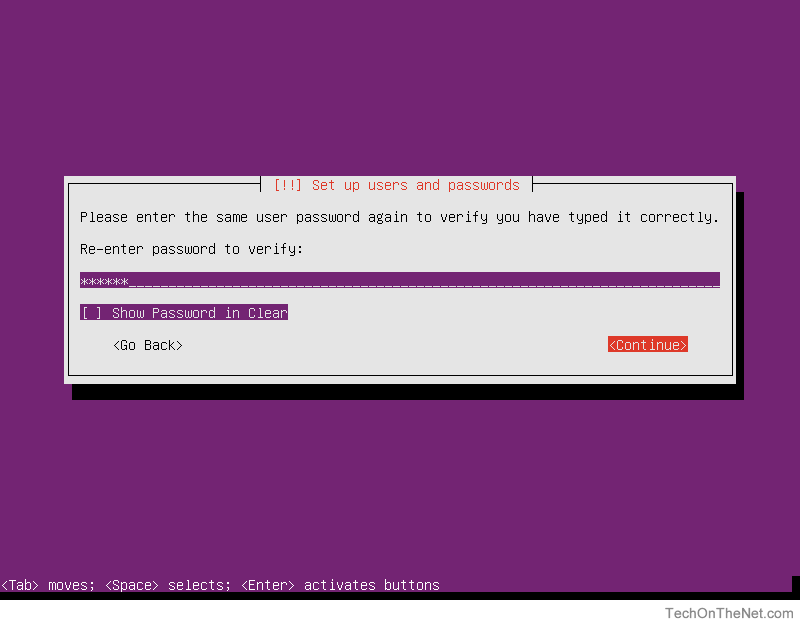
After re-entering the password, press the Tab key until you get to <Continue> and then press the Enter key.
-
If you entered a weak password, the installer will prompt you to confirm that you want to proceed or re-enter a stronger password.
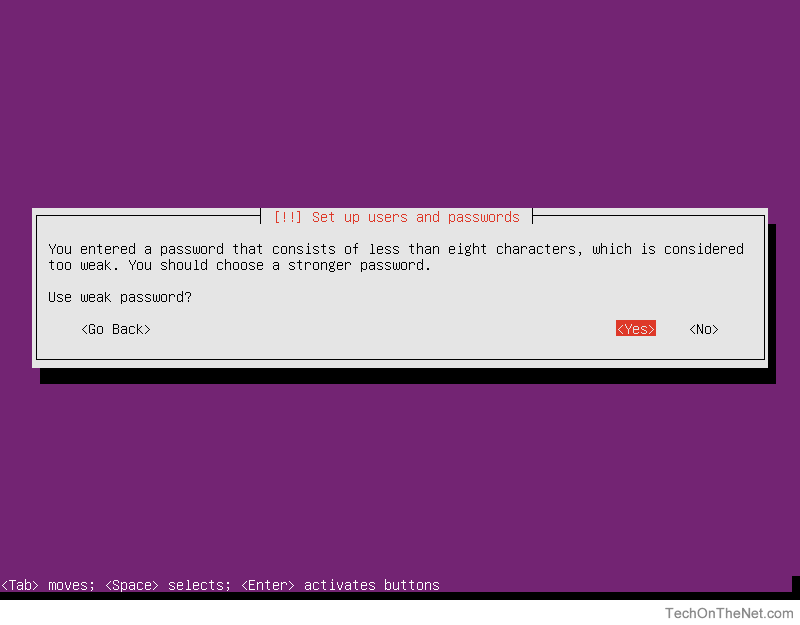
Since our machine will only be used for this tutorial, we will accept the risk and continue. If you choose <No> you will have to repeat the password selection (steps 11 and 12). If you choose <Yes> you will proceed to the next step.
-
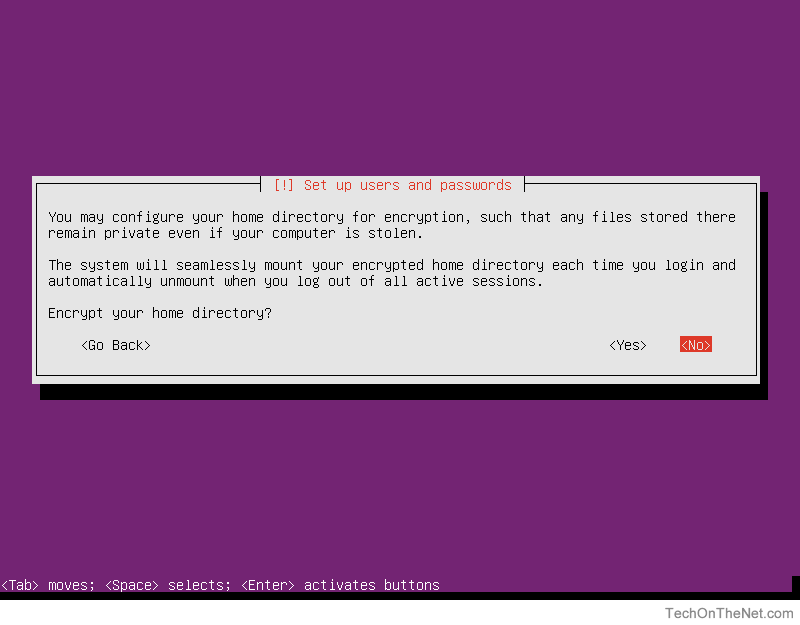
Ubuntu allows you to encrypt your home directories for security. This is useful for situations where users require security on items they keep in their home directories.
For this tutorial, we will select <No> and not encrypt the home directories.
-
In this step, you will configure the clock and choose the time zone your computer will use. The system time services will use this setting to display the correct local time.
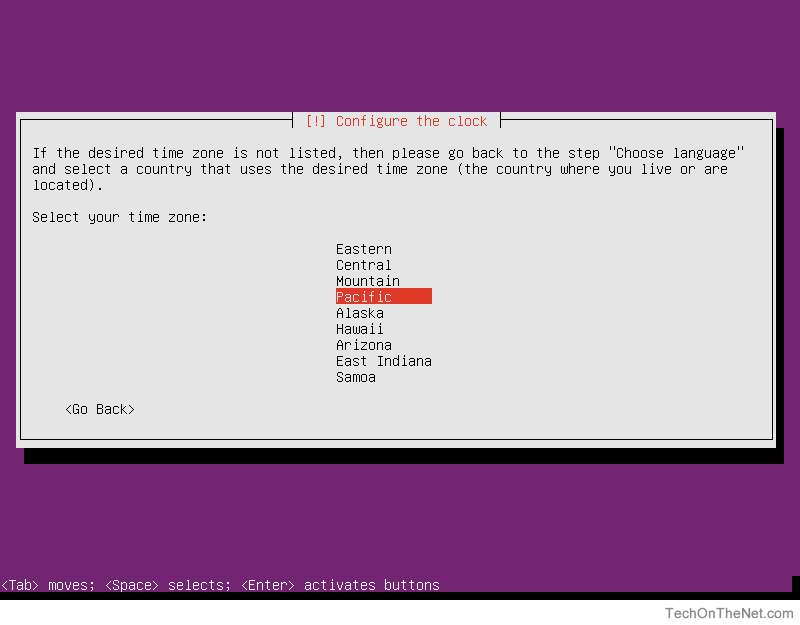
On our system, we will select the Pacific time zone.
-
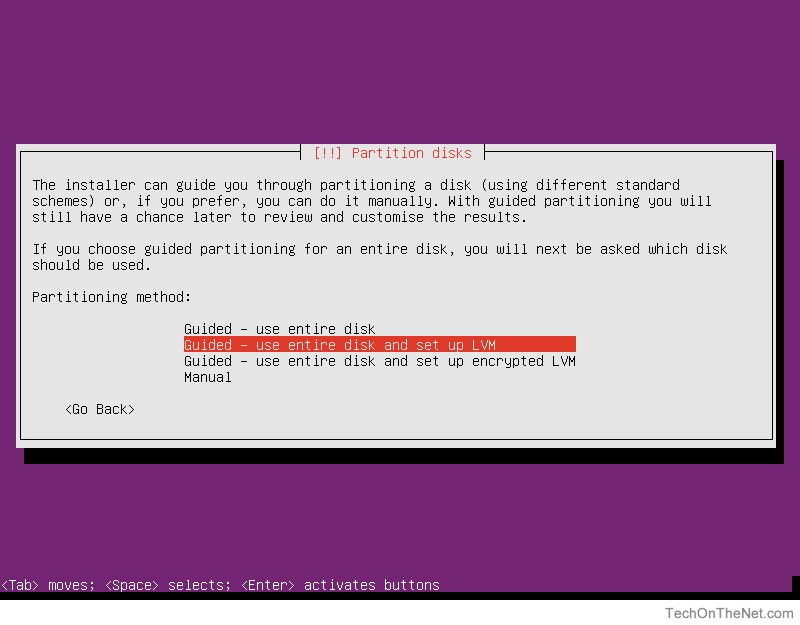
Ubuntu will now ask you to configure your hard disk partitions. There are several choices available:
- Guided - use entire disk
- Creates a non-LVM (Logical Volume Manager) partition layout which follows a more traditional UNIX layout. This scheme creates fixed partitions which can not be easily changed without re-installation or advanced knowledge of Linux.
- Guided - use entire disk and set up LVM
- Allocates a small boot partition and places the remaining available disk space into a logical volume in which the other partitions will be created. LVM allows additional flexibility in how the logical volume will be laid out or changed in the future.
- Guided - use entire disk and set up encrypted LVM
- Creates a similar partition layout as the previous option but encrypts the logical volume with a password.
- Manual
- Allows manual configuration of disk partitions. This is an advanced mode typically used by experienced UNIX administrators and allows full control over the layout of the partitions.
For this tutorial we will choose the second option which is Guided - use entire disk and set up LVM.
-
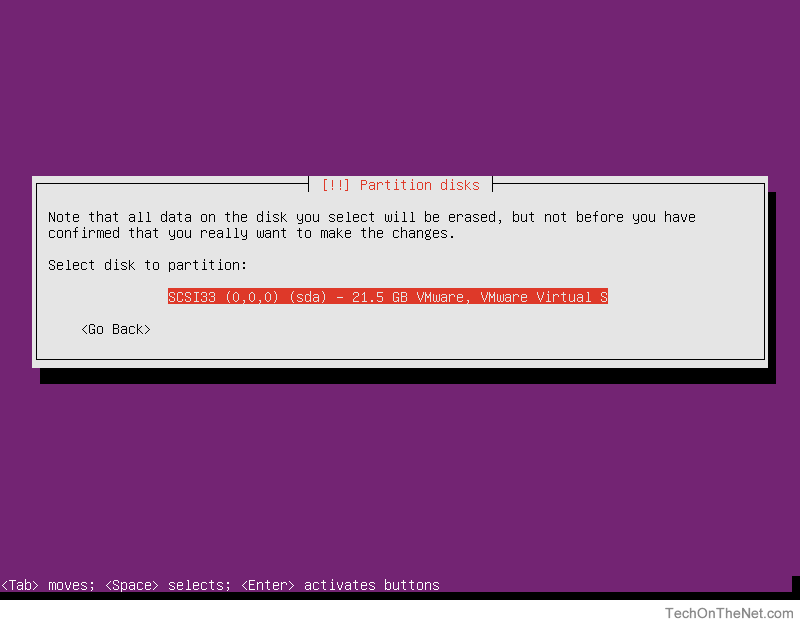
Next we will need to select the hard disk that we will apply the hard drive partitions to. Since our computer contains only one hard drive we can accept the defaults and continue. If your system has more than one hard disk, you will need to select the appropriate hard drive your system is set to boot from.
-
The installer will now confirm that you are prepared to write the partition layout to the hard disk you have selected.
IMPORTANT: This is your last chance to abort the installation before your hard disk is erased. Please be sure you have backed up any data you would like to keep!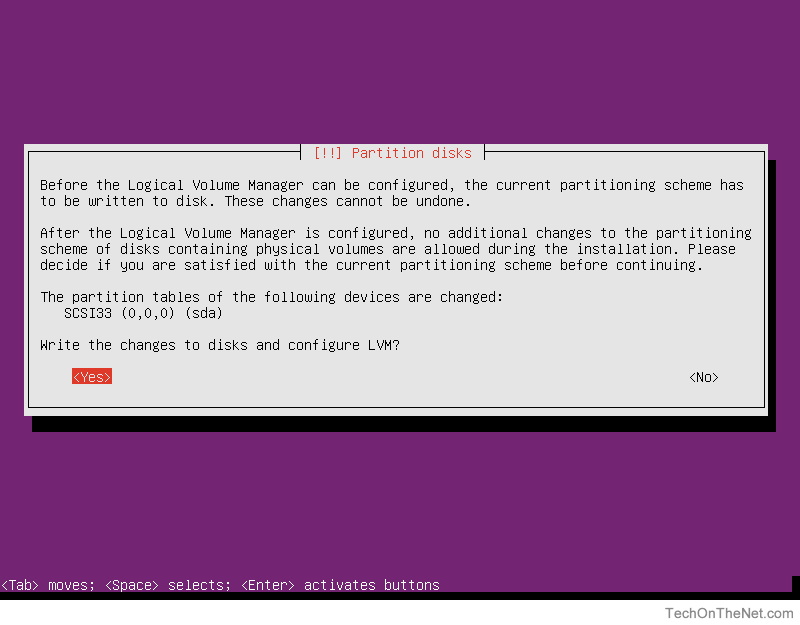
If you are ready to apply your selected partition layout to the hard disk, tab to <Yes> and then press the Enter key.
-
In this step you will be entering the amount of hard disk space you would like the installer to use for Ubuntu Linux Server. The installer will by default fill in the total amount of space available on your hard disk but you can lower this value to leave some space available for other purposes.
Values are typically entered in MB (megabytes), GB (gigabytes) or TB (terabytes).
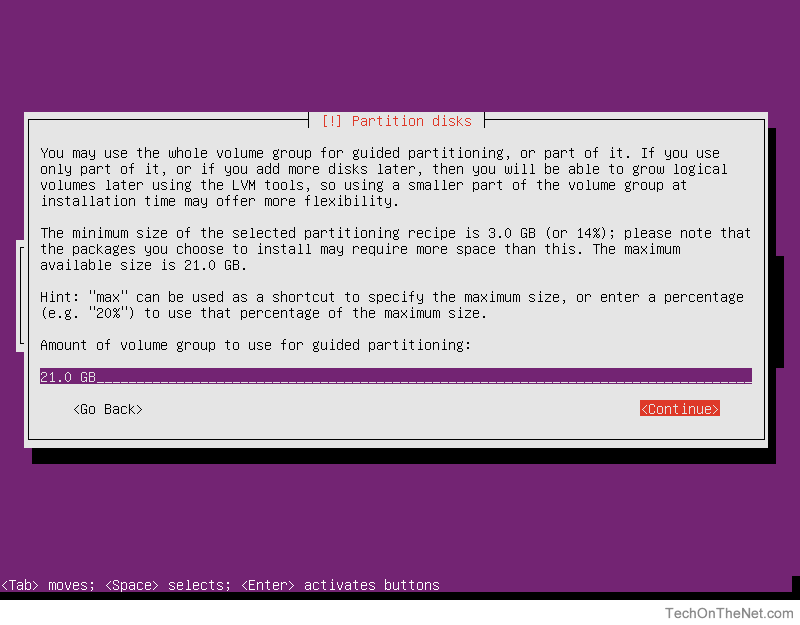
We will leave the value unchanged which will tell the installer to utilize all available hard disk space. Press the Tab key until you get to <Continue> and then press the Enter key.
-
The installer will confirm that you are ready to write the partition information to the hard disk.
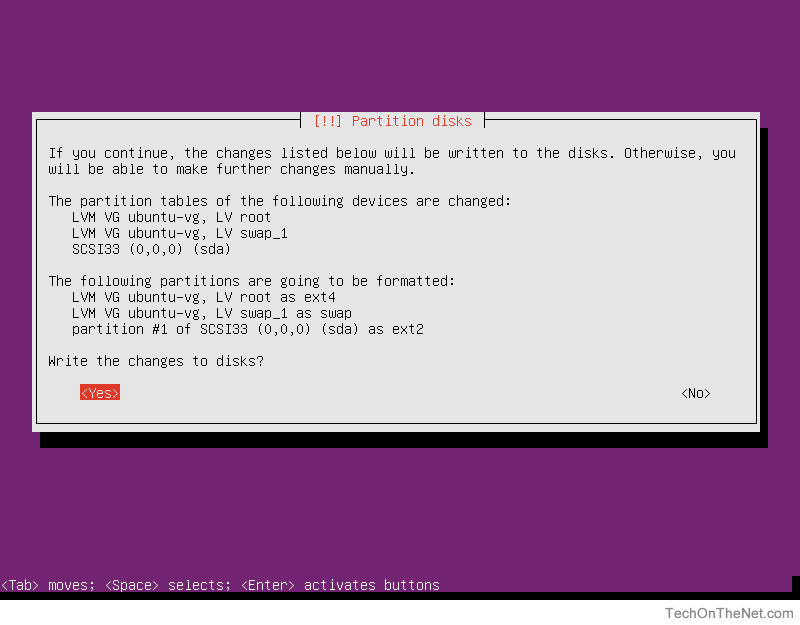
Since these settings are correct and we are ready to write the partition information we will select <Yes> to continue.
-
If you utilize a HTTP proxy on your network, you can enter the proxy information on this screen.
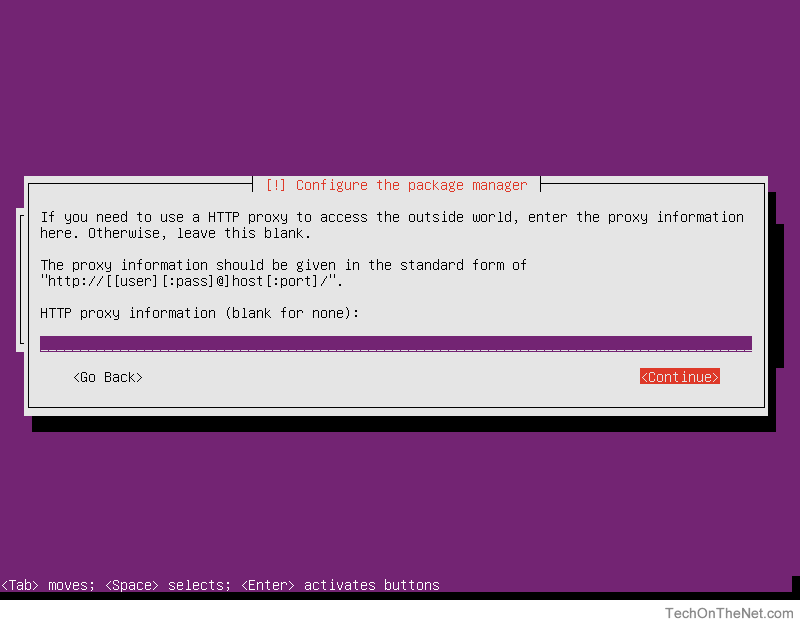
In this tutorial we will not provide any HTTP proxy information so we press the Tab key until we get to <Continue> and then press the Enter key.
-
Next, the installer will ask if you would like to configure automatic system updates. The options available are:
- No automatic updates
- The system will not apply any updates automatically. System updates will require manual intervention by a system administrator.
- Install security updates automatically
- Updates which resolve security issues will be applied automatically once per day.
- Manage system with Landscape
- System updates will be managed externally by the Landscape application suite.
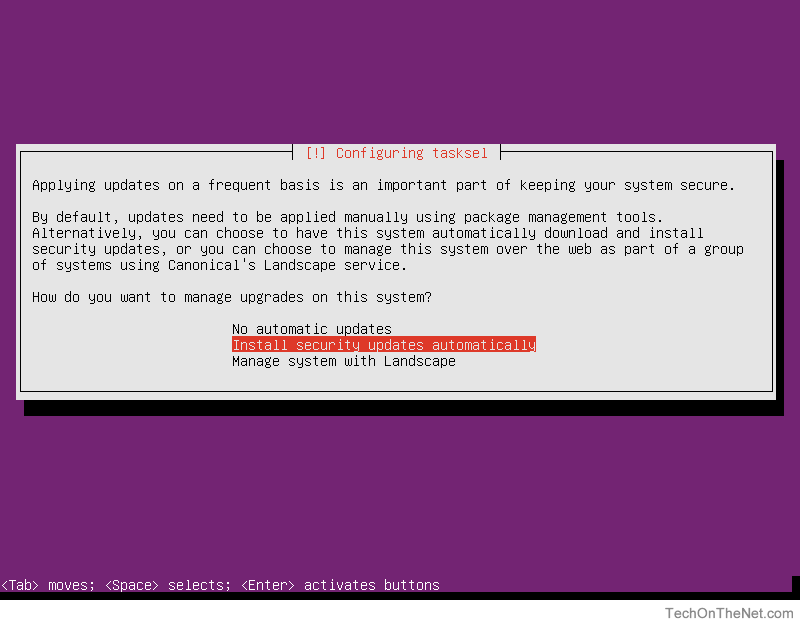
It is always a good idea to ensure security updates are applied in a timely manner so we will select Install security updates automatically for this tutorial.
TIP: If you are concerned that an automatic update might break other software or services the host offers you may want to select No automatic updates and apply the updates manually when required. -
At this step we will be asked to select any additional software or services we would like to install on the host. By default the standard system utilities option is selected. This option contains many of the system utilities that we will need to manage our system so we will leave it selected.
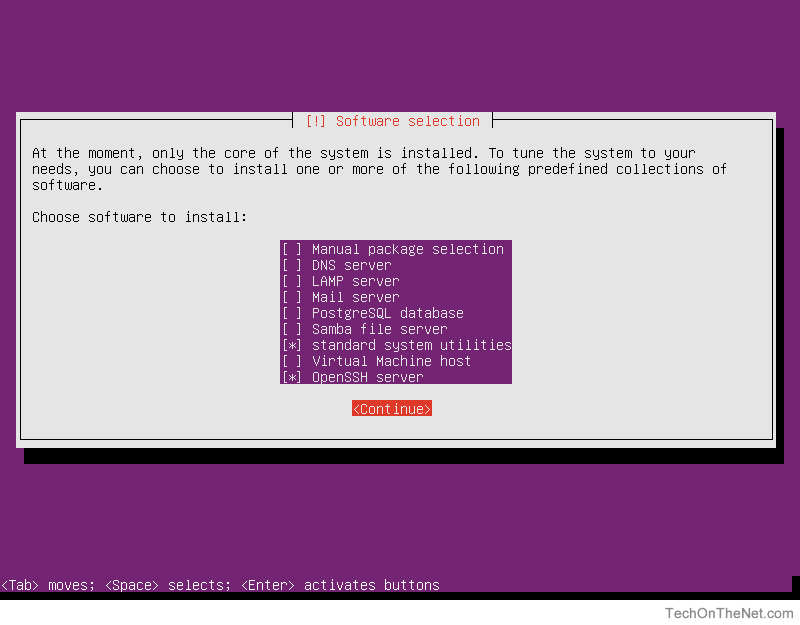
Since we would like to be able to log into the host using secure shell (SSH) from another host on the network we will also select OpenSSH server.
You can select a menu option by pressing the Space Bar. Moving between menu items can be accomplished by using your keyboard's Arrow keys.
When you are finished selecting the software, select <Continue>.
-
The system will now ask to install the GRUB boot loader onto the master boot record of your hard disk.
GRUB is used during the boot up process to enable Ubuntu Linux Server to load.
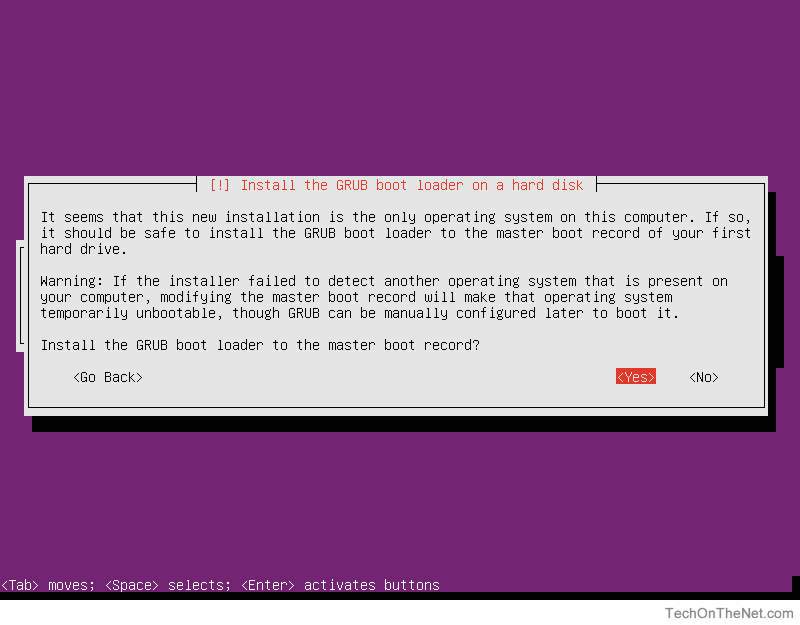
We will select <Yes> to install the GRUB boot loader.
-
The installation is complete!
The installer will now prompt you to reboot the computer.
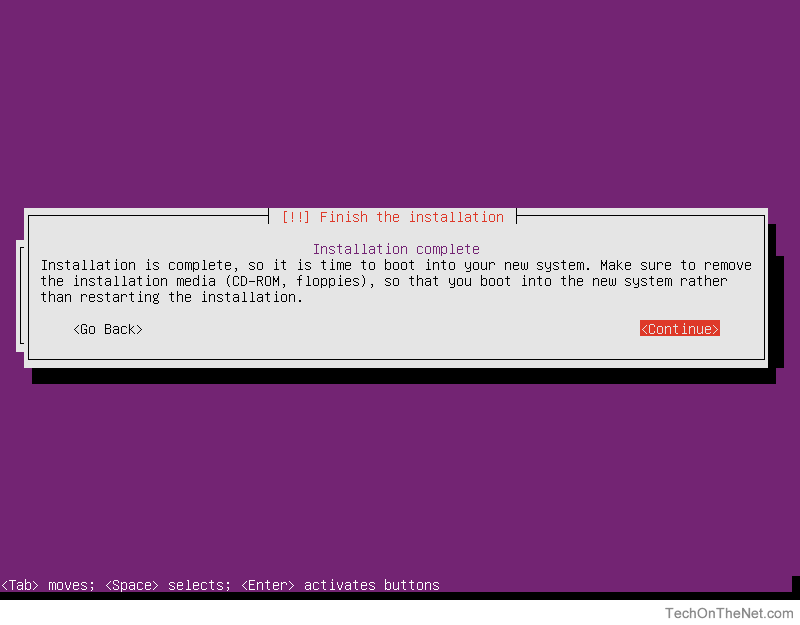
Select <Continue> to reboot into Ubuntu Linux Server.
-
If all goes well in a few minutes you will see a login prompt similar to the following screenshot.

Congratulations, you've installed Ubuntu Server Linux!
You can now log in using the user name and password you configured during steps 10, 11 and 12.
Advertisements